
Media Cleaner is a very advanced tool and should be used by someone who understands the mechanics of WordPress very well. This is not a one-click cleanup kind of tool, and cannot be. Also, cleaning the database of temporary entries or old drafts is easy, but files always are potentially in use. Media Cleaner is a tool in your hand. Make sure you are in control of it.
Absolutely backup your site (the database and the /uploads directory) before doing this. I recommend you to use your hosting service backup system if they have any, a staging website if it’s available (WPEngine has one) or the very well-made BlogVault service.
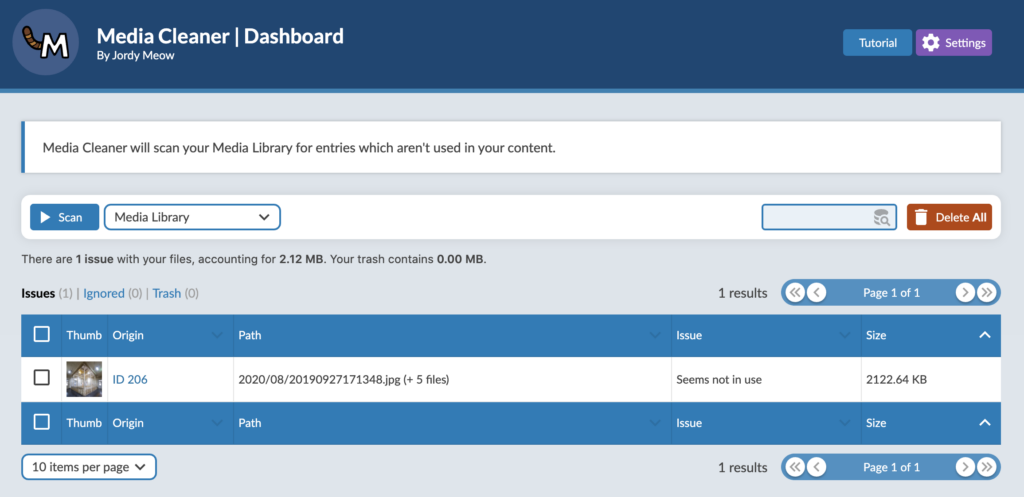
The Dashboard
The Media Cleaner’s Dashboard is found under Media > Cleaner. Before doing anything here, you will need to decide your settings. However, it’s better to understand how the plugin works, and this dashboard is where the magic happens.
How to use it
Here is how you should use the plugin, without going
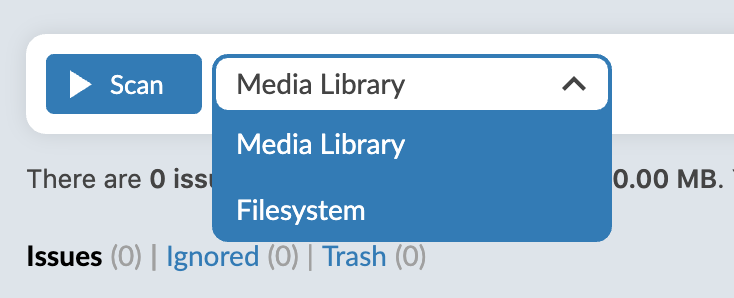
Scan (Media Library or Filesystem)
Click Start Scan and then enjoy a coffee. The plugin will analyze your WordPress. Once the analysis is fully completed, the results will be displayed.
Check the results carefully
Watch out for the false-positive entries. For example, images used by the theme directly, such as logos, headers, etc. Look for them, and if they are part of those results, select them and click Ignore. Then, they will never be deleted by the plugin.
With the Media Library Scan, you will get a certain number of files between parenthesis, for example: “myfile.jpg” (+ 10 files). This is because there is an original file, and all its related thumbnails. If it’s not clear (or new) for you, please check my article about WordPress Image Sizes. With this scan, all the thumbnails are considered as used if any of them (or the original file) is used. You can optimize this further in the Delete Useless Thumbnails section of this tutorial.
Delete or Ignore entries
You can search (= filter) through them. If you click Delete all after a search, only the results of this search will be deleted. You can also delete the entries one by one or by selecting a few of them. If there aren’t enough entries listed on each page for you, you can set this up differently in the settings. Remember that the files are being moved to the internal trash of the plugin, so they are still taking space in your install.
Test your website
Browse your website thoroughly. If it’s a rather small website, you can simply visit every page manually. You can also run a Broken Links detector. Or… time will tell?
Empty the trash
Everything has been been fine for a while? Click on Empty trash. The entries will be permanently deleted. Congratulations!
Different types of issues
- Seems not use. The media entry (or file) has not been found in the content of your website.
- No attached file. The media entry has no attached files. This media entry is broken.
- Not in Library. The file doesn’t belong to any entry in your Media Library. It’s probably an orphaned file, such as a thumbnail used by a previous theme.
- Orphan Retina or WebP. File which doesn’t have a master anymore. You can delete those your eyes closed.
Now that you know the process of Media Cleaner, let’s have a look at the settings.
The Settings
The settings are found under Meow Apps > Cleaner. By default, they are already good for most usage.
There are two types of scan of scan. You can select it from the Cleaner Dashboard.
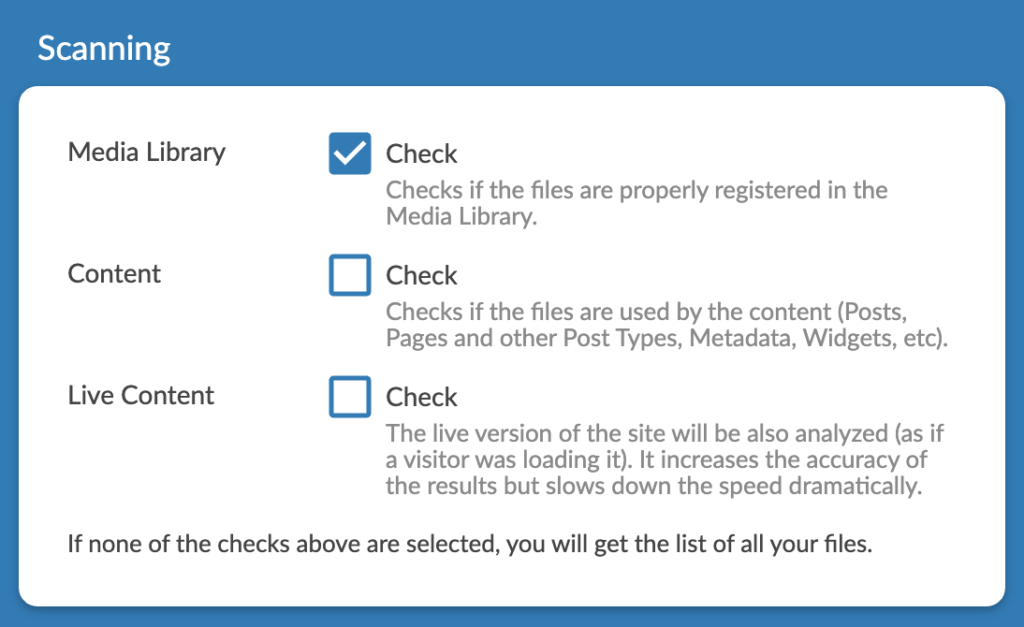
- Media Library: This scan will go through all your entries in the Media Library and check if those entries are used by your content.
- Filesystem (Pro Only): This scan will go through all the files under your /uploads directory independently, and will check if they are registered as an entry in your Media Library, or directly used by your content.
In the settings, each type of scan has its own tab, with the related settings.
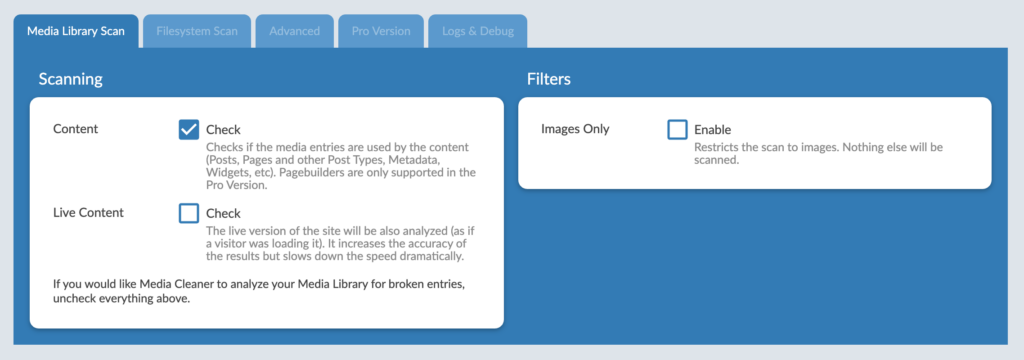
Media Library Scan
Media Cleaner used to be much more complicated, with many options. It has been simplified over the years, as users simply want scan the content as a whole. But keep in mind that Media Cleaner looks at everything, everywhere, and even know how your plugins are handling your data.
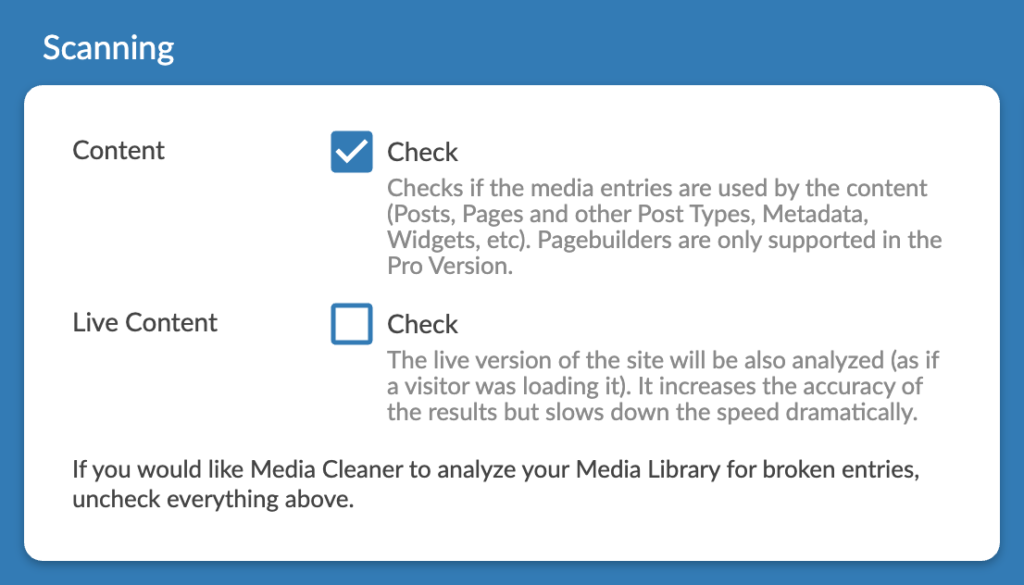
Content. The scan will analyze your content (and extract all the references to your files).
Live Content. The scan will analyze all your pages by visiting them as if it was a visitor of your website. This option slows down dramatically the scan.
Images Only. If you only want to check your images, check this.
Filesystem Scan
This is a Pro feature. The settings are very similar to the Media Library scan.
Media Library. In this case, your files will be matched against your Media Library. This is the best way to clean your install: if only this option is selected, then all the files which aren’t part of a media entry will be detected as unused.
Content. This will check if a specific file is used by your content directly. I insist on directly, that means by using its path. Often, images are used by the content through their Media ID, and then, when the page is generated, the actual paths are written.
Live Content. Same as with the Media Library scan.
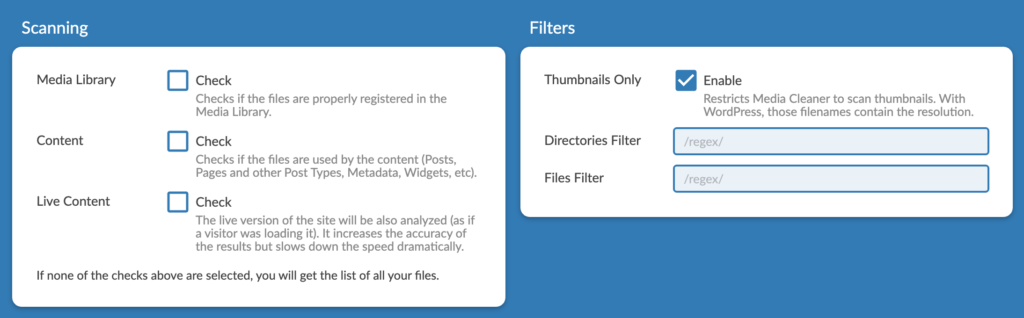
Filters
Those filters will be applied during the scan.
Keep in mind that you can also search through the results of your scan using the search function in the Cleaner Dashboard. For example, you can type “/2020” in the search and results will be filtered by that directory. So you might not need those filters, they are for advanced users.
Before the filters are applied, the scan will need to go through all the directories and files first (one reason is that, even if you filter out a directory, some files or subdirectories might match positively your filters). Therefore, using filters will not make the scan faster.
Directories Filter and Files Filter can restrict the scanning to specific folders and/or files depending on a regular expression (expressed between two slashes). If you don’t know how to write a regular expression, it might be interesting for you to learn. There are many tutorials online, and then you can test them on websites such as Regex101. Here are a few examples:
- Directories Filter: /^$/ (only scan the root of your /uploads directory)
- Directories Filter: /^2018/ (scan only the files from 2018)
- Directories Filter: /^[0-9]{4}\/02/ (scan only the files in the February directories)
- Directories Filter: /^((?!wp-slimstat|woocommerce-pdf-invoices|wpo_wcpdf|arprice|mk_assets|fvm).)*$/ (avoid scanning specific directories)
- Files Filter: /400×400.jpg/ (scan only the files of resolution 400×400)
- Files Filter: /.jpg|.png/ (scan only the png and jpg files)
Thumbnails Only. Will only scan your thumbnails and avoid the original (full-size) images. This could also have been done with a regular expression but is to make life easier for most users. Have a look at the Recommended Procedures for the usual usage of this option.
Advanced
Those settings are either self-explanatory, or are used to optimize the speed of the scan, depending on server’s performance.
Logs & Debugs
Logs. This option will create a file (which is reset at every scan) containing all the files detected in your install in the first section, then the result of the scan for every media or file in a second section.
Recommended Procedures
Having a headache already? Here are the typical procedures that you should be aware of.
Standard Check (Media Library)
This is the most common analysis performed by most of my users. It analyzes your Media Library. The default settings are already fine.
Meticulous Check (Filesystem)
This is a Pro feature. After the Standard Check, this is the most recommended scan. This one will carefully check if your files are indeed registered under media entries. Normally, they all are! But as you will soon realize, it’s really easy for WordPress to become a mess, and having gigabytes of unused files is not very surprising (which could be also WebP and Retina leftovers). By default, the settings are already fine.
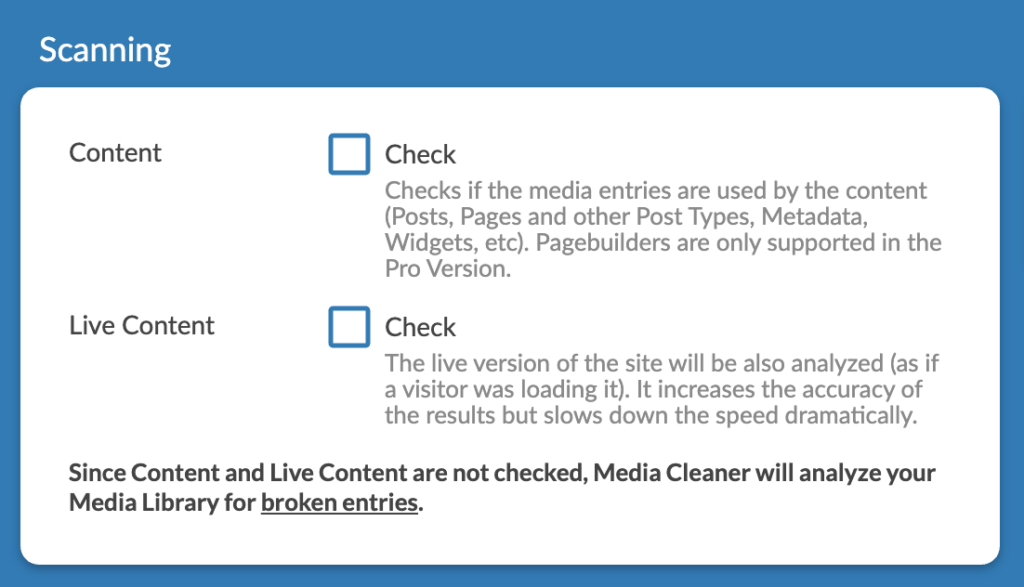
Broken Media Check
Do you have a lot of broken media entries? This could be useful for you. It will check the broken media entries, by basically looking if the related files exist or not. For this special check, you’ll need to uncheck all the settings under Media Library Scan.
Delete All Thumbnails
This is a very special operation, but which could be really useful. For this one, in Filesystem Scan, you need to uncheck everything, and check Thumbnails Only.
Why to do this scan? Overtime, a lot of thumbnails are created, and the metadata of your images (depending on when they were added, in which condition, which theme and so on) are totally different and inconsistent. But ideally, for a really clean install, all your media entries would have the same metadata (with the same sizes registered in them), and approximatively the same number of related files.
There are plugins that are supposed to delete the thumbnails, but they actually only delete the thumbnails which are registered
There are basically three steps:
- Start this filesystem scan, then delete all your thumbnails in your system
- Check your WordPress carefuly: which sizes are registered through your themes, and plugins? You probably don’t need all those registered sizes, you can maybe disable or remove those programatically (remove_image_size) or use a plugin such as Perfect Images
- Generate all your thumbnails again (many plugins can do this, including Perfect Images)
Delete Useless Thumbnails
You feel like WordPress is created a huge amount of thumbnails, while only few of them seem to be in use. You might be right, practically. But technically, this is wrong: all the thumbnails registered in the metadata might currently be in use or… at a later point of time. Even if you delete them, since they are part of the metadata, they will be regenerated. So what’s the solution? You need to trust yourself in being able to pick which sizes are actually needed by your site (for example, if you use WooCommerce but don’t use any WooCommerce Galleries, you could disable the corresponding registered image size).
Media Cleaner doesn’t have the feature to list image sizes and disable some of them. However, the Perfect Images plugin (in its free version) does it. If you really want to do that, here is how: Perfect Images Tutorial. Keep in mind that this is not about cleaning, it’s about overriding your theme/plugins behavior. Once you did all that with Perfect Images (which is, disable a few Image Sizes and Regenerate your Thumbnails in order to refresh all your metadata), you can visit the previous section in this tutorial called “Meticulous Check (Filesystem)”. That will erase all the corresponding files automatically.
Automation: WP-CLI
This is a Pro feature. It’s not possible to automate the process of cleaning. It would be way too dangerous, uncontrollable, and would also slow down your install at every visit. I actually advise you against scheduling automatic process directly on WordPress. However, you can do this using WP-CLI, and that will not slow down your install as it will be executed in a different environment.
If you are the admin of your server or if your hosting services offer you SSH access and WP-CLI, you can run Media Cleaner from the command line. This also brings new possibilities like running a scan every once in a while, getting the results by e-mail, etc.
Basic Commands
To run the scanning based your current settings:
> wp media-cleaner scanYou can override the settings it is running with by specifying the method filesystem or media) and the options (check-media, uncheck-media, check-content, uncheck-content). For example, for running the Standard Check, you would use:
> wp media-cleaner scan media check-contentAt the end of the scan, the list of issues will be displayed. If you need to have it displayed again (or to count the number of lines), you can use:
> wp media-cleaner issuesEach result with look like this in the listing:
– [#407] Media 268: 2025/09/my-file.png (+ 4 files) (NO_CONTENT)
The first ID is the one used by Media Cleaner. So above, if you need to delete or restore exactly this entry, you will need to use 407.
Advanced Commands
If you want to go further and automate all this, at this point, you must prepare a backup. Then you can run the deletion process, and the issues will be sent to the trash. You can specify a certain issue ID to only delete that one.
> wp media-cleaner delete
> wp media-cleaner delete 407
If you want to list the items in the trash, you can use:
> wp media-cleaner trashIf you realize there are items you do not want to delete, you can recover then:
> wp media-cleaner recover
> wp media-cleaner recover 407
And finally, if you would like to empty the trash, you can also do that.
> wp media-cleaner emptyAdvanced Shell Scripting
The WP-CLI should be used by administrators, so hopefully they are very fluent with piping and shell commands such as grep, sed and all the others. Thanks to all this, you can perform search on the issues (or the trashed items), restore a selection of them, etc.
For now, I will share one useful command with you:
> wp media-cleaner issues | grep tokyo | sed -n 's/\- \[#\([0-9]*\)\].*/\1/p'This command above will list all the issues with contains tokyo (in the filename), and will only display the Media Cleaner IDs of those issues.