
For everything to work, you will need a plugin in Lightroom and another plugin in WordPress. The WordPress plugin is called Photo Engine and can be found on the WordPress Repository. You can also install it directly from WordPress, from the Plugins section, by searching for “Photo Engine”.
Installation
Get a Key and the Plugin for LR
You will need to buy the Plugin for LR, which is called WP/LR Sync. You can click on the BUY LR PLUGIN button, or click here. Then, you will get a download link, and a license key.
Installation of the plugins
Unzip the plugin for LR in the directory where the plugins are kept on your system. In fact, it doesn’t matter where you install it, but this is just my recommendation:
- Windows: Program FilesAdobeAdobe Lightroom Classic
(or %appdata%RoamingAdobeLightroomModules) - Mac: /Applications/Adobe Lightroom Classic/Adobe Lightroom Classic.app/Contents/PlugIns/
Note that the uncompressed directory (from the zip) should be named wplr.lrplugin. The .lrplugin part of the filename is how Lightroom recognizes that it is indeed a plugin. Restart your Lightroom. In your Lightroom Plugin Manager, the plugin should appear. Enable it.
If it is not listed, you will need to add it manually through the Add button and look for that .lrplugin file (you can try to go through File > Plugin Manager in Lightroom). If this explanation is not enough for you, check Jeffrey Friedl’s page about it: how to install Lightroom plugins.

Lightroom might ask you if you want to upgrade your catalog, which is normal, no worries 🙂
Basic Usage
Add a new WP/LR Sync Publish Service. Go the the Publishing Manager, click Add, and select WP/LR Sync.
Note: Don’t use more than one catalog to sync with a particular website. You can, however, create many Publish Services in one catalog for the same website. In that case, all the photos must be different. I recommend you to have a one to one relationship between your website and your Publish Service (and therefore, one catalog).
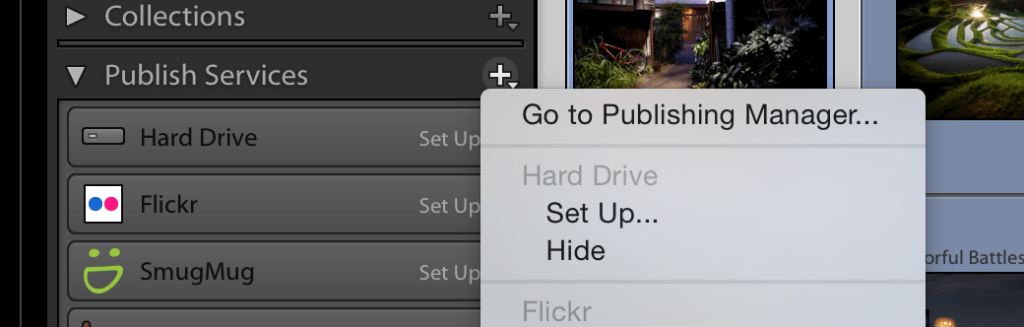
The window containing the settings of the Publish Service for WP/LR Sync should appear.
The next paragraph is important 🤓 Please read it carefully.
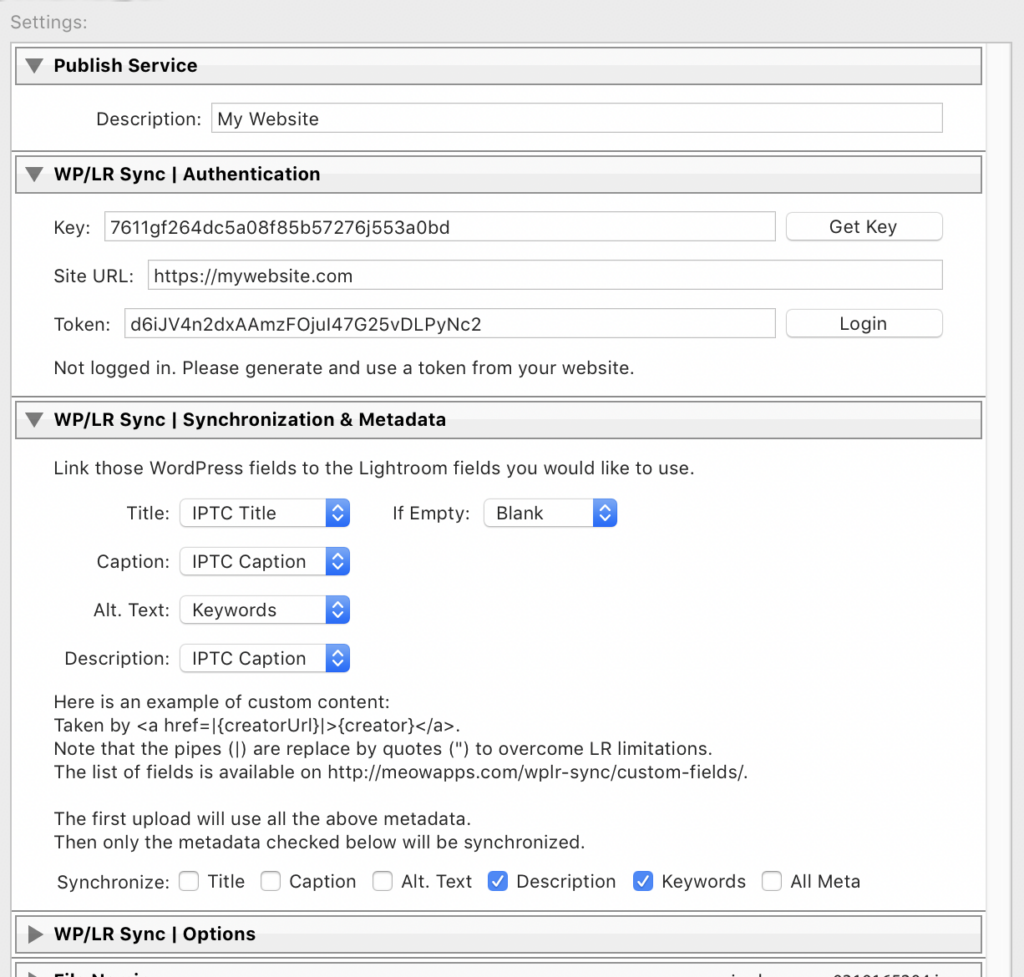
The Serial (License Key), The WordPress URL of your website, and the Token are mandatory fields. The WordPress URL should be the base URL of your website. Be careful with the https or
If you use WordPress.com, this “Your Profile” page might look different. You’ll need to switch from Default to Classic interface in the Settings of WordPress.com.
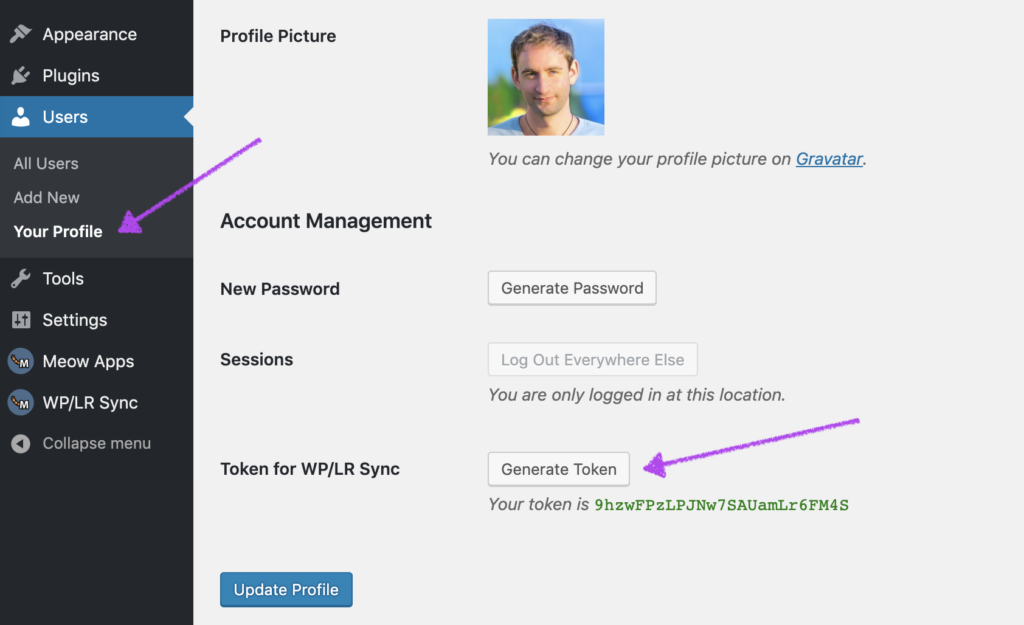
Once entered, click on the Log In button and you will be able to save those settings and use this new service immediately.
If you get an error, please check this: Debug Errors & Connectivity.
Settings
In the Synchronization / Meta section
Important ! You should tweak the settings a bit. I actually suggest you the settings below. If you don’t set any limits (Image Sizing), the generated images might be too large and WordPress (or any other plugin) might generate an error or a timeout. Do not worry much about the Resolution (set at 240ppi here – if you do, have a look at this article).
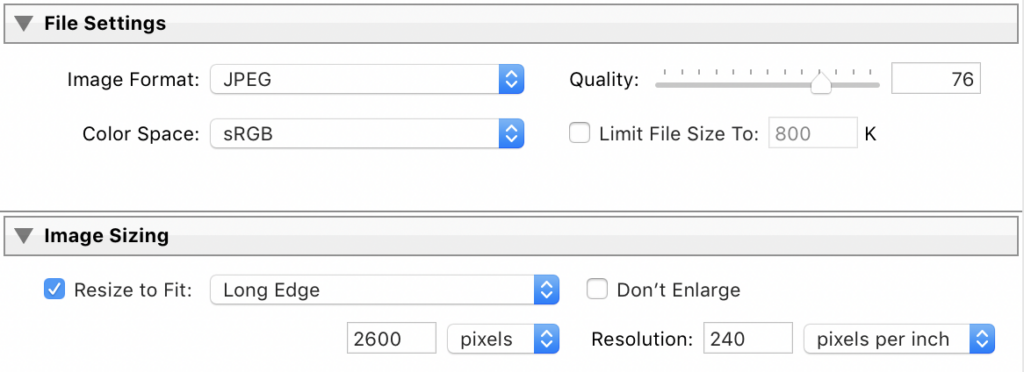
Note : WP/LR Sync don’t generate those final images. The section of the settings presented above is actually part of Lightroom engine. WP/LR Sync only ships and synchronizes the files.
🚧 If you are using Wordfence (or another firewall plugin), it may block Photo Engine’s REST API requests by default. The plugin cannot bypass your firewall, so you’ll need to allowlist its endpoint: /?wplr-sync-api
You are all set! Like a normal Lightroom Publish Service, you can drag & drop photos in the folder called Photos and Publish them. If you make any modification on those photos, you will be able to synchronize those changes via the Publish button.
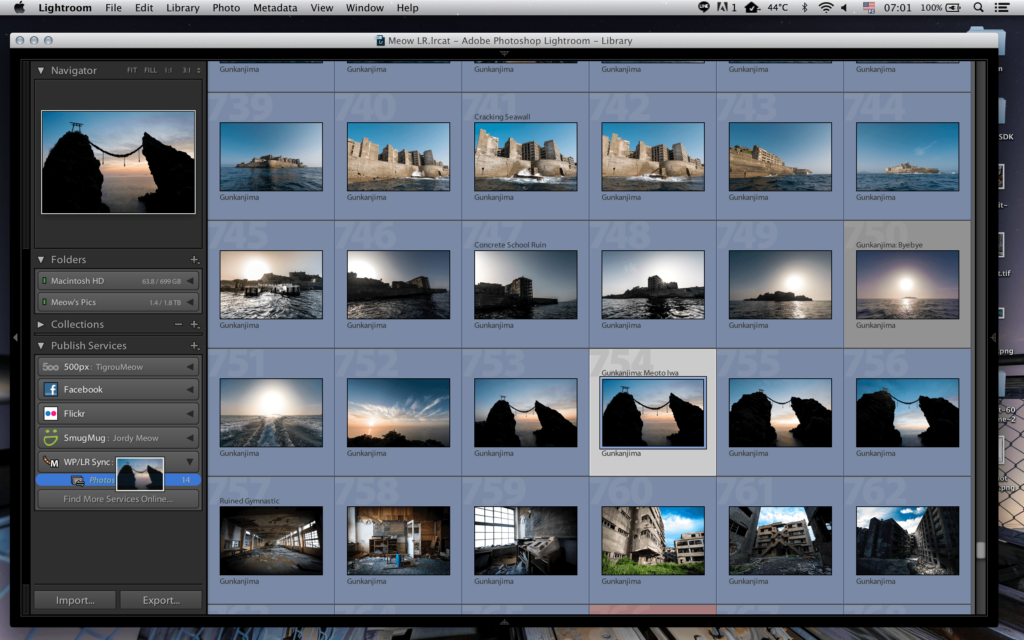
Photos added in the collection called Photos will be only available in the Media Library, and that’s fine.
If you create collections, smart collections (in folder(s) or not), the photos in those will be also available in your Media Library. The hierarchy of folders and collections is stored internally by Photo Engine (in WordPress) and can be used by themes or other plugins through the extensions, or the Media Organizer (we’ll look into this later).
Customize your filenames
In the settings of the WP/LR Sync Publish Service, you should define the way those filenames are decided. Here is what it looks like.
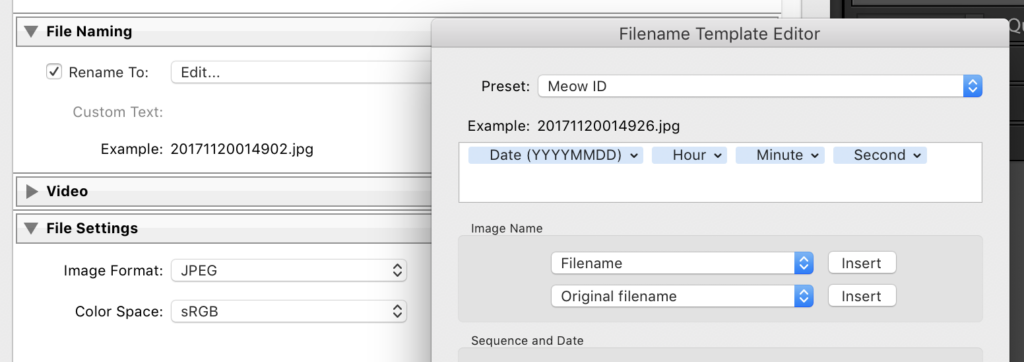
There is no correlation between the filename of your photo on your hard-drive (in Lightroom) and the one used by WordPress. The first time WP/LR Sync uploads a photo, this filename (based on the File Naming screen) will be used. Then, on further synchronizations, the filename will rename the same one (to avoid breaking anything in your HTML, by safety).
If you wish to rename your files after they have been uploaded to the Media Library, have a look at the Media File Renamer plugin.
Folders and Collections
In the List Mode of the Media Library, a new filter is added by Photo Engine. You will be able to pick the collection, and filter by it.

Better, you can also enable the Media Organizer.
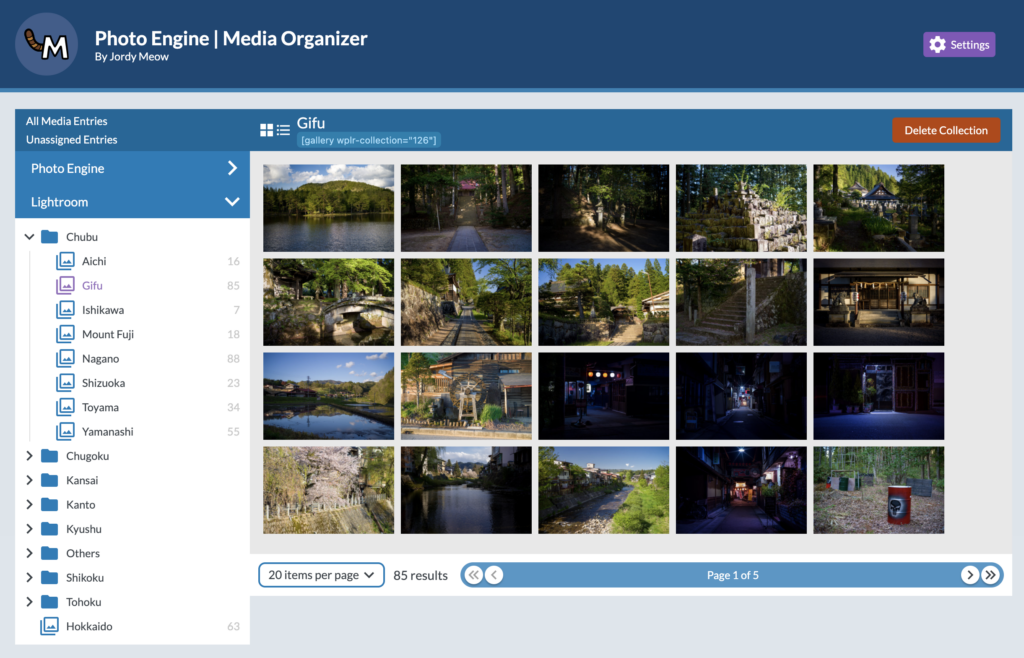
Alternatively, there is also the Media Browser which adds a sidebar on the left of the standard Media Library.

You can also enable the Debugging Tools in the Settings. Then you will be able to check the hierarchy of collections but also the hierarchy of keywords and other things. All this data can be consumed by other plugins and themes through the WP/LR Sync API.
Total Synchronization
If you want to take care of (= linking) all the photos that you previously uploaded before using WP/LR Sync, the next step is to use the Total Synchronization module.
So now, what about all those hundreds of thousands
There are two ways of linking your WP photos and with your LR’s ones. I suggest you to start with the automatic matching first, then finish-up with the manual matching if you have any not-linked photos left.
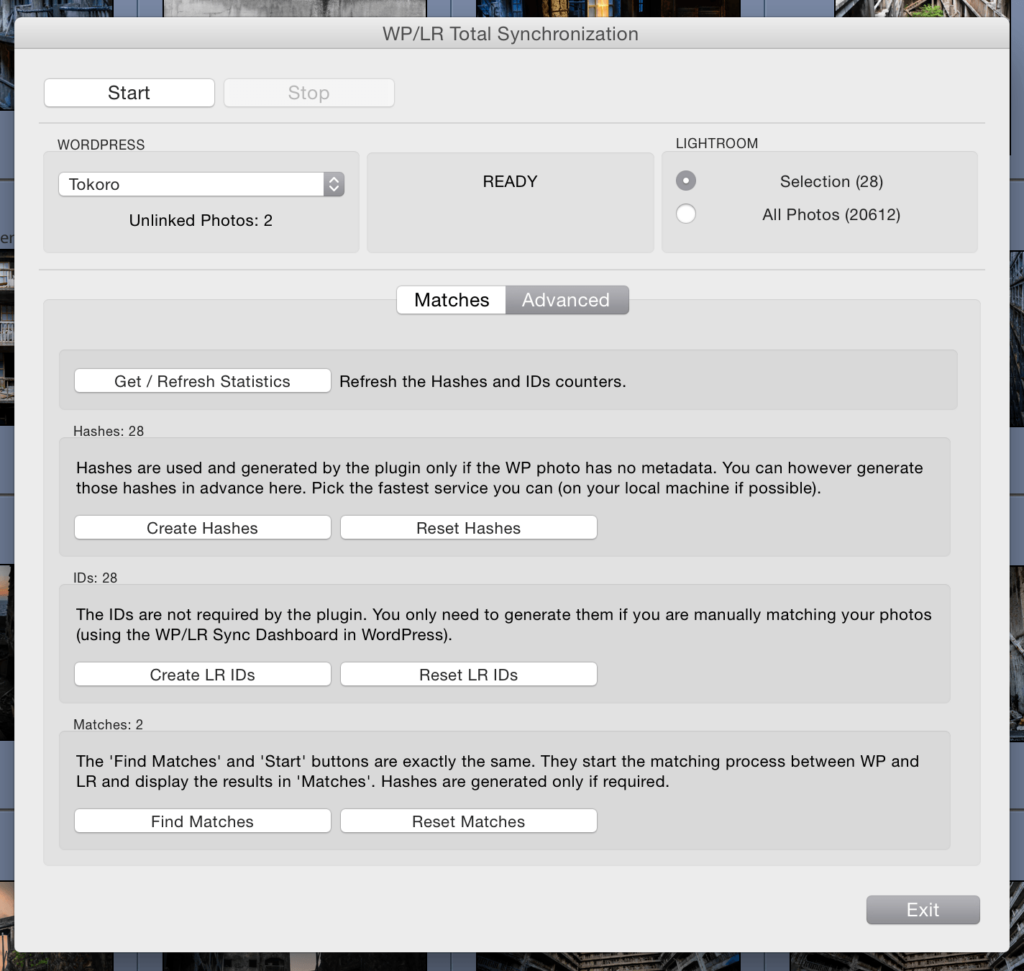
Automatic Matching
The automatic matching attempts to match the photos between WordPress and Lightroom. This matching is done by comparing the metadata, and, if not available, by using perceptual hashing. This hashing is slower and generally less accurate but provide perfect results if the photos are actually similar in your WP and LR.
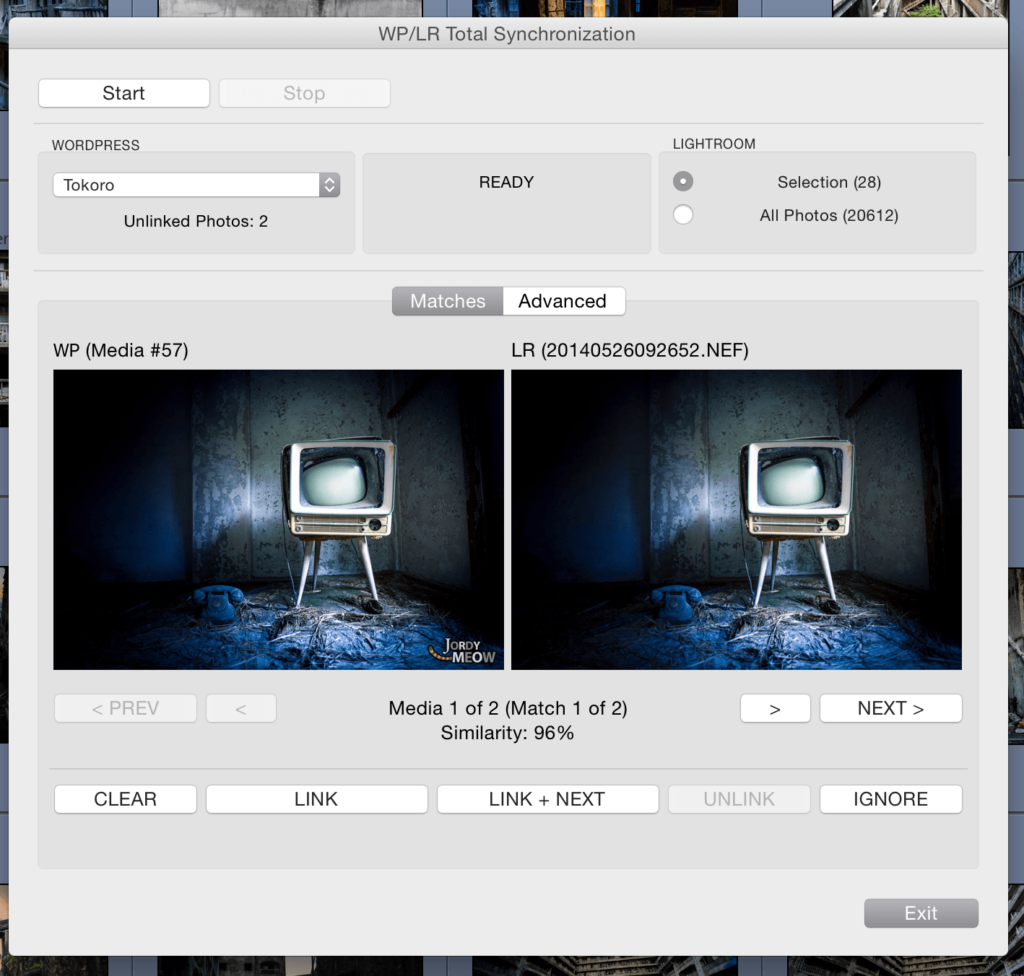
The module is accessible through Library Menu > Plug-In Extra > Total Synchronization.
Starting the process is very easy. Make sure the WordPress website is selected (on the left) and that enough photos are selected on the Lightroom (on the right, you can work with a selection of photos or all of them). Click Start! Then you might want to go to bed. Depending on the number of photos and the need of hashes, that will take some time.
Many requests will be performed to your WordPress server. This is usually fine, however, a few hosting services might terminate those requests abruptly. If you get the “Got an error from WP” message, please check the FAQ.
As new matches are found, they are added to the screen. When the whole process ends, you will be able to use the actions at the bottom.
- CLEAR. Remove this match from the screen. It does nothing to your LR or WP. Basically that is just to clear your dashboard from the matches you are done with.
- LINK. The actual linking is done through this button. The LR image will be moved to the Publish Service (as a “New Photo to Publish”) and the image on WordPress will be marked as linked.
- LINK + NEXT. Same as above. Then it moves to the next match! You might especially want to use that button since it is convenient. If you make a mistake, the “Unlink” button will rescue you.
- UNLINK. Did you link two images by mistake? No worries. You can use this button to un-link them.
- IGNORE. You might have external images, logos, icons and so on in your WordPress. By ignoring them, you will never see them again in WP/LR Sync.
Once you are done with all your matches, you can Publish the changes. Fresh images will be applied to your WP Media Library.
Manual Matching
The same photo might sometimes
Start with
The ID is
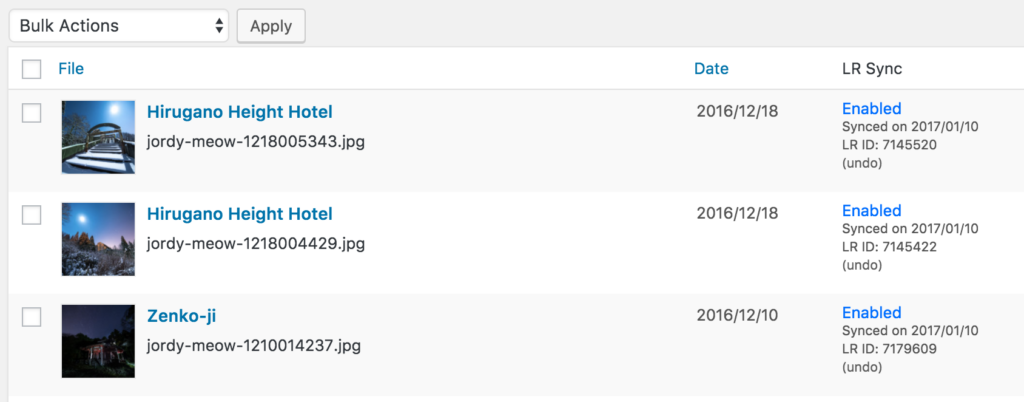
The manual matching has to be done on Lightroom and WordPress. When the photo is not yet linked to LR, its status (in the Media Library) is marked as “Unknown” and a text box can be found below. You can copy/paste the LR ID you got from LR in here and click Link.

Then, immediately, you need to drag & drop the photo in the Publish Service’s folder Photos.
Those two photos are now linked! During the next “Publish”, the photo will be replaced with a fresh one using your export settings.
You can also check your Settings -> Media to enable the WP/LR Tools then you will get a WP/LR Dashboard in the Media menu. With this dashboard, you can directly see and work with the Unlinked Photos and Duplicates.
Optimize the Images
Congratulations, you are now uploading your photos from Lightroom. You might want to use the Perfect Images plugin in order to add High-DPI (Retina) support and to make sure only the image sizes you really need are
You also might want to optimize those images’ size. I have prepared a guide for you here: Image Optimization for WordPress.
Go further
Do you want to go further, and sync WP/LR Sync with your theme portfolio, galleries, or something else? WP/LR Sync is very powerful and can do a lot of things for you. Check about the extensions.
Sync with a Page or a Gallery
This article is difficult to name properly but basically, you are here because you would like to sync your collection of photos in Lightroom with a certain (type of) page on your website and/or a gallery.
Quick Intro & Solutions
If you are not interested in technical details, or simply don’t understand them, let me share with you the 4 easiest ways to create dynamic galleries based on WP/LR Sync data.
- The WordPress Gallery. You don’t need any specific plugin for this to work. You can already visit the Galleries section under the WP/LR Sync menu in your WordPress, hover a gallery, copy the shortcode which is displayed, and paste it somewhere (in a post, for example). Depending on your theme, that WP Gallery will be more or less pretty, but you can find ways to make it look better.
- Meow Gallery. That’s the Meow Apps’ solution! It works nicely with the Native Galleries (WP Gallery). If you are using the Gutenberg Editor, it provides you with the Meow Gallery Block, in which you can directly pick the collection from WP/LR Sync.
- FooGallery. This plugin supports WP/LR Sync right away and you can pick collections right from it.
- Justified Grid + Real Media Library. This solution is a bit more complex as it requires you not only to install those two plugins, but also WP/LR Sync Folders (which keeps the data in WP/LR Sync and RML synchronized). Please note that WP/LR Sync Folders is maintained by RML.
If you would like another gallery to support WP/LR Sync, that’s actually not very complicated for them to do, they just need to be willing to! And I will be glad to help. For this, please contact them directly.
Technical Details
How WP/LR Sync works
First, let’s recap what the plugin does. WP/LR Sync uploads and keeps your photos synchronized with the Media Library. This is its main function. The plugin uses WordPress naturally, without hacking it, in order to be 100% compatible with all the WordPress processes.
WP/LR Sync does two more things, a bit less obvious:
- it keeps the hierarchy of folders and collections in its own database in your WordPress, and make it accessible to developers. Therefore, if any plugin or theme wants to get this info, it can.
- it shares with other plugins/themes events about the synchronization. For instance, such events are: a folder is created, a collection is added to it, an image is added (or updated) to a certain collection, another one being deleted, etc. Any other plugin or theme can react based on those events.
Now, you can link a collection with a gallery shortcode or you can link through a clever process all this data to your WordPress through WP/LR Sync Extensions. Or maybe you are using one of the Gallery Systems available.
Standard WP Gallery
The standard WP Gallery is the one using the shortcode “gallery” and included with WordPress from the start. To use it with WP/LR Sync, it is very simple. Visit the menu called “Collections & Keywords” under WP/LR Sync in your WordPress. By hovering with your mouse over your collections and keywords, the plugin will generate a little shortcode on the right side. You can simply copy/paste it and insert it somewhere on your website.
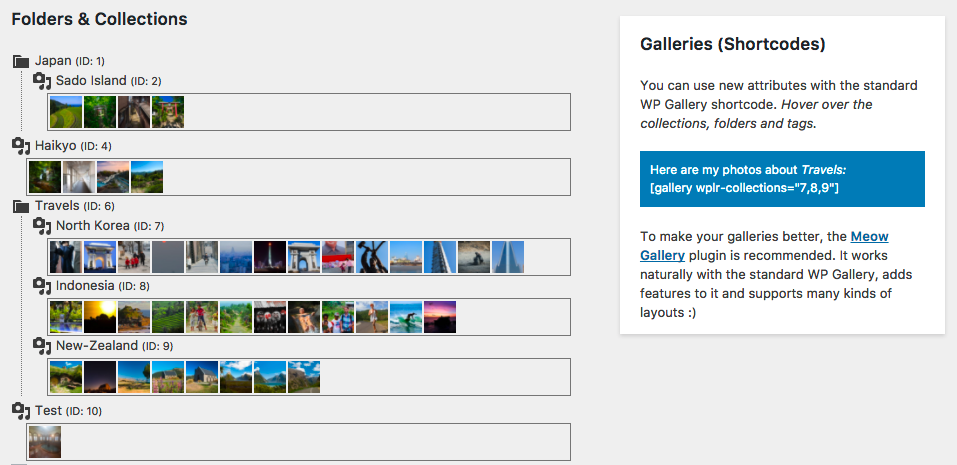
Don’t worry if the WordPress Post Editor can’t display the images right away in the preview. It does it when the page is generated, so visit it directly. Any images added to your collection in Lightroom will be automatically part of this without any updated required (except maybe caching).
WP/LR Sync adds the following new parameters to the WP Gallery shortcode:
- wplr-folder
- wplr-collections
- wplr-keywords
- wplr-keywords-and
This process is totally natural to WordPress and a gallery such as the Meow Gallery can make it even prettier.
WP/LR Sync Extensions
This kind of page should be called a post-type. A post-type can be a post (standard), a page (standard), a portfolio, an album or whatever else. Those pages are defined by your theme, sometimes by other plugins. The way they exactly work is only known by that theme or plugin.
Between WP/LR Sync and your Theme
You probably now understand that there is no direct natural link between a collection and a page on your website. They have nothing in common. But WP/LR Sync has data (and events) that can be used to sync more things on your website. Of course, WP/LR Sync can’t guess how the data should be used or what should be done since all the themes are different.
This glue between WP/LR Sync and Themes is made through the WP/LR Extensions. You can check on the subject here.
Developers or Theme Developers can make their own extension for WP/LR Sync. That would be the easiest for the users, but they often don’t know WP/LR Sync yet or don’t have any time to allow to make one.
I made a generic extension called Post Types that covers most of the themes. It basically works with all the themes handling galleries, portfolios, posts or other post-types in a natural WordPress way. You can check the information and tutorial about it here: Post Types Extension.
3. Gallery Systems
There are many gallery systems available, more or less old and more or less using WordPress naturally. Prefer systems which are using the Media Gallery in a natural way, to avoid issues in the future. Also, absolutely avoid old/heavy plugins which tends to also lock you in.
Keywords
WordPress actually doesn’t really know about keywords and doesn’t have any features related to them. The only keywords you will see (in the Media Edit Page) are the keywords which are registered in the EXIF of your image.
However, keywords related features (fields or else) are sometimes added by themes and plugins. WP/LR Sync also has a feature to do this. It’s important to understand how those keywords are implemented by your WordPress install, if they are available.
The Keywords Taxonomy
Usually, the keywords are added as a WordPress taxonomy and used by the Media Library. “Keywords” is actually the friendly name of the taxonomy. The internal name is probably quite different.
In the case of WP/LR Sync, the Keyword feature (added through an option in the settings) is called attachment_keyword. If keywords were added by your theme, or by another plugin, the internal name is probably different and therefore, it’s like you are dealing with two totally different taxonomies, even though the friendly name is the same.
Enable Keywords & Sync Keywords
In WP/LR Sync settings, there are two important options: Enable Keywords and Sync Keywords.
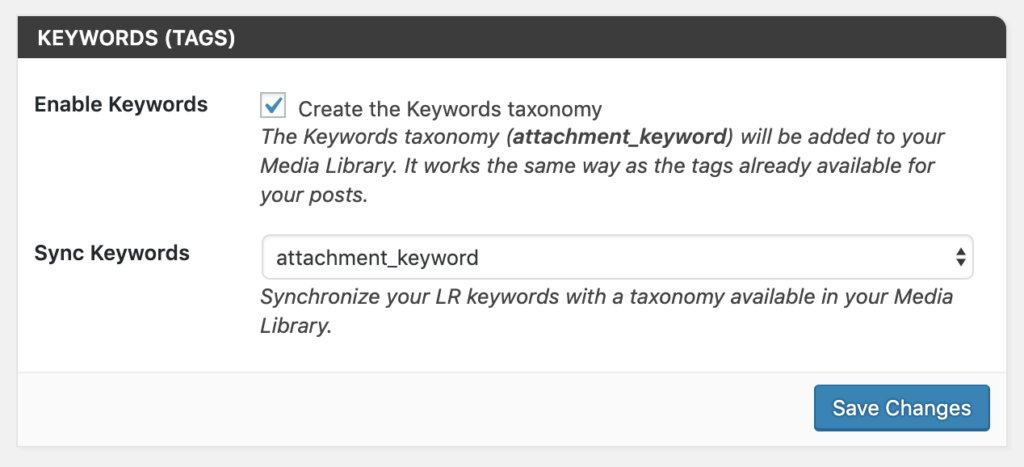
The first one will create the Keywords taxonomy (attachment_keyword) we talked about earlier.
The second option will let you pick this new taxonomy, or another taxonomy (if you would like to use the Keywords taxonomy created by the theme or another plugin for example). With that setting, WP/LR Sync will keep the keywords updated between Lightroom and this taxonomy.
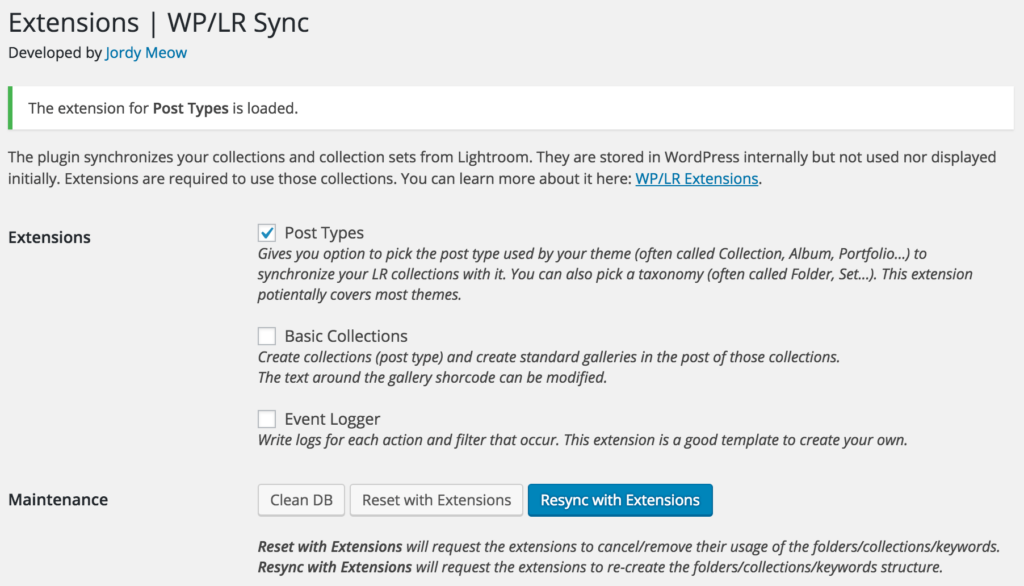
Resync with Extensions
WP/LR Sync also keeps the information about your keywords in its own database on the WordPress side. Even if you are not using any Keywords taxonomy yet, the keywords are kept in it. You can see them by visiting the Galleries under the WP/LR Sync menu.
The day you start using an extension using keywords, or if you start using the Keywords taxonomy we discussed earlier, you can click on the Resync with Extensions button in the Extensions screen. WP/LR Sync will emit events for everything that has happened between Lightroom and WordPress, and that will trigger the features of Sync Keywords or the features of the extension you are using.
The Keywords in WP/LR Sync
WP/LR Sync, as you might know, has its own little database with information about your images… and it also keeps information about your keywords and their hierarchy, just in case! 🙂 There are a few features brought by Photo Engine (WP/LR Sync) which allows you to use them directly, to create a gallery for example.
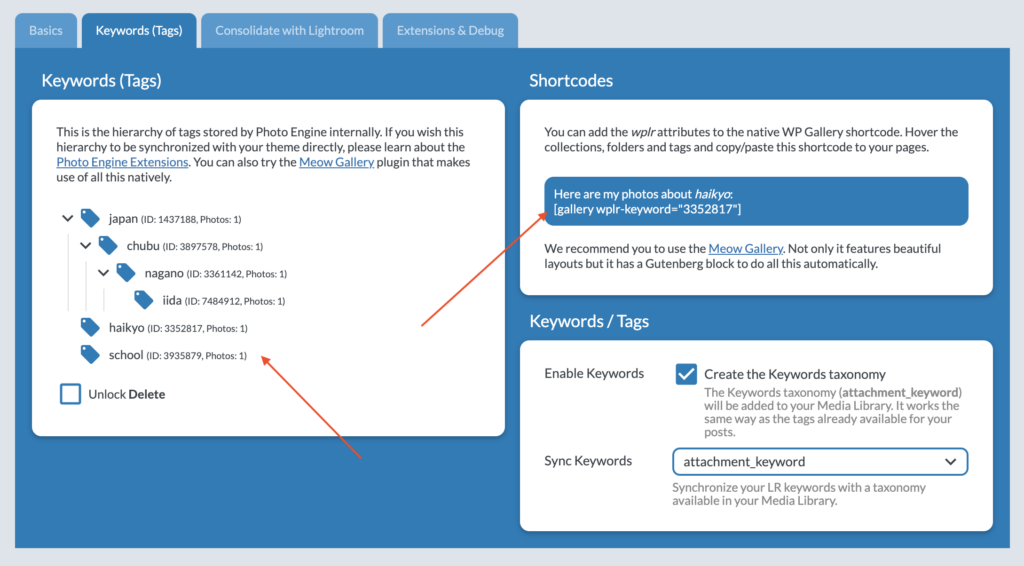
In the Settings, you will find a Keywords section. In it, you can see the list of keywords currently in the database, and the section on the right will give you the shortcode to use if you want to create a gallery based on them.
If you wish to delete some keywords, it’s also possible; you will need to unlock the deletion process by clicking on Unlock Delete.
Custom Content for Standard Fields
This article is about customizing the standard fields of the media entries in WordPress (Title, Caption, Alt. Text and Description). If you are looking for a way to synchronize your metadata with WordPress custom fields (created by your theme or plugins such as ACF), you will need to use another plugin for that. I recommend you to take a look at the Media Library Assistant plugin.
Here is the list of the keys you can use to create your custom content. Please note that the pipes (|) are replaced by double-quotes (“) automatically to overcome Lightroom internal issues.
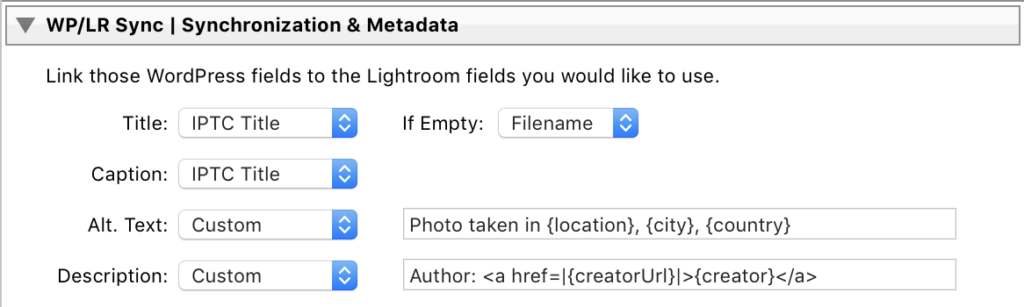
Please note that WP/LR Sync is not responsible for the formatting of this data, it is coming from the EXIF/IPTC of your images and it is interpreted by Lightroom.
Examples
- Was taken by <a href=|{creatorUrl}|>{creator}</a>.
- Was taken in {location}, {city}, {country}.
- File: {folderName}/{fileName}
Recommended
- title: The title of photo
- caption: The caption for photo
- folderName: The name of the folder the file is in
- fileName: The leaf name of the file (for example, “myFile.jpg”)
- location: Details about a location shown in this image
- city: The name of the city shown in this image
- country: The name of the country shown in this image
- copyright: The copyright text for this image
- creator: The name of the person that created this image
- creatorUrl: The web URL for the person that created this image
- source: The original owner of the copyright of this image
For a full list of available fields, here you go.
The Theme Assistant
WP/LR Theme Assistant is an extension for WP/LR Sync that allows you to create mappings between the WP/LR Sync API and the technical structure of your theme in order to automate content creation. Typically, it is used to create a page containing a gallery for each of your collections in Lightroom. Thanks to the WP/LR Sync API, everything will be also kept synchronized. Let’s study a simple example first, and then, let’s dig deeper.
WP/LR Theme Assistant is a free extension for WP/LR Sync. You can download from the WordPress Repository, here. You can also clone it from GitHub, improve it or modify for your project.
Free support is not provided for this extension. You will need to hire a developer or try to understand how it works. If you have any questions, please use the WordPress Forums.
If you are using a specific theme or gallery system, we recommend you to contact their developers with a link to this page. They should be able to provide some information on how to set up the Theme Assistant, or better… they might even add native support for WP/LR Sync (and you will not need to install this plugin, in this case).
Introduction: Pages or Posts
You will be able to do this on a very simple install of WordPress. By default, Pages and Posts are always available. Let’s automate the creation of those depending on your Lightroom content. You can pick either Post or Pages, but Pages are usually static (not dated), as Posts are for blogging, updates, etc. Here is a usual configuration.
You can start creating folders and collections in your WP/LR Sync Publish Service in Lightroom and they will be also created on your WordPress accordingly. Folders will be Category, and Collection will be Posts. They will be published right away. Inside those posts, you will find a WP Gallery (which is the standard WordPress Gallery).
Note: Don’t forget about thee Smart Collections in Lightroom. Photographers usually like to have pages featuring their latest photos, or photos based on specific tags, keywords, locations, etc. You simply need to create a Smart Collection in the WP/LR Sync Publish Service and that will work.
Sync with your Theme
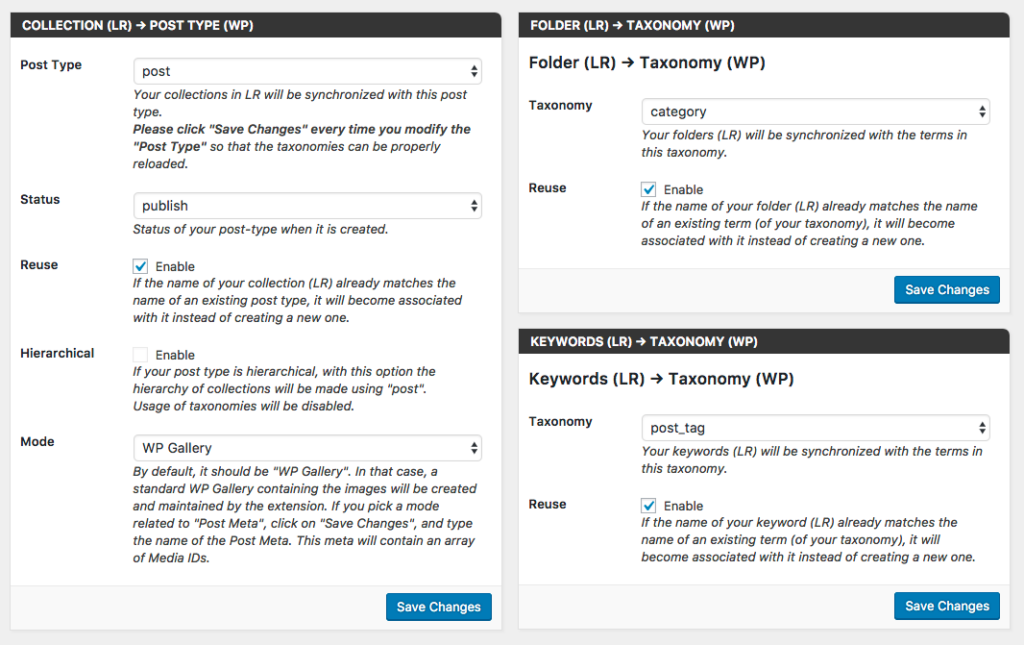
There are three WordPress technical elements you need to understand: Post Type, Taxonomy and how the data is stored.
There is a shared Google Document keeping track of themes and the settings for the Post Types extension here: WP/LR Sync & Themes (Post Type Settings).
Post Type and Taxonomy
Page and Posts are the two standard Post Type shipped with WordPress. However, you might be using another Post Type created by your theme, or by a plugin. They often called Collections, Galleries, or even Products. We call them Custom Post Type (CPT) but don’t worry! Technically, they
For example, by installing the Tripod Theme, we notice that this Galleries menu was created. This is a CPT. By clicking on Galleries, I can see that the URL is /wp-admin/edit.php?post_type=gallery. The real technical name of this CPT is therefore gallery.
The Taxonomy is optional with the Theme Assistant, but you might want to check it. It is usually called Category, Tags but also Folder, Set, etc.
In the screenshot above, we can see Category and Tags. Those are taxonomies. By clicking on Category, you can see that the URL is /wp-admin/edit-tags.php?taxonomy=gallery-category&post_type=gallery. We got our taxonomy! It is a gallery-category and it is indeed used by the CPT gallery we discovered earlier.
Of course, we could choose to work with Posts instead of the CPT created by the theme. That is totally up to you.
Mode (or how the data is stored)
You now need to find out how the collections of images are stored by your WordPress. Do you wonder what it means? In the Introduction, we linked our Lightroom to Post and Pages, and we choose the WP Gallery method. The effect of this is that for each page created, a gallery (actually a WordPress shortcode which gets transformed into HTML) is written into it. But your theme might require that you pick images in a special field, and that can be stored and managed completely differently from one theme to another. I personally wished they all use the native gallery, but they don’t.
This part is a bit technical, so you can try to understand and find it, ask your developer, or get information from the developer of the theme itself. I am really able to help on this subject as I would need to study every single theme out there.
As of today, the Theme Assistant can handle four modes (methods):
- WP Gallery
- Block for Meow Gallery
- Shortcode Block for Gallery
- Array in Post Meta
- Array in Post Meta (Imploded)
- Array of (ID -> FullSize) in Post Meta
- Array of IDs as String in Post Meta
WP Gallery
This is straightforward: it simply creates a standard WP Gallery (using the shortcode). Here is an example of how a WP Gallery looks in the editor.
Note that it is made using the Classic Editor and not the Gutenberg Editor. However, if you decide to edit it with Gutenberg, it will still work (it will be considered as a Shortcode Block for Gallery).
This is the simplest way to create galleries in general as it is standard and will always work, whatever your theme is.
Block for Meow Gallery
If you are using Gutenberg, this is the recommended way. You will need to install the Meow Gallery plugin, and automatically the block for it will be created and kept up to date.
Shortcode Block for Gallery
This is the Gutenberg equivalent of the WP Gallery mode. It will create the gallery using the shortcode block.
You might wonder why isn’t there a Block for Gutenberg Gallery mode. This is because it is impossible to manage/update a block (any Gutenberg block) from the server-side. Changes can only be made through the Gutenberg editor, by a human being. This is, I believe, a very poor decision taken by the WordPress team (they probably didn’t realize it; I contacted them about it but I think they are building WordPress more than actually using it). However, I implemented the Meow Gallery Block differently to make this possible and thanks to that, there is a Block for Meow Gallery mode.
Array in Post Meta
Unfortunately for us, themes (or plugins) often prefer to use their own way of storing data. In that case, they normally use an Array of Media IDs (that represents your collection) in a Post Meta, also known as a Custom Field (more about it here: https://codex.wordpress.org/Custom_Fields). Now, you need to find out what is the name of this custom field.
There are a few ways. The first is to edit your post type (gallery, post or anything else), open the Screen Options at the very top and enable the Custom Fields. This will display the fields (post meta) used by the current post type you are editing. If it’s not displayed, you are out of luck.
It’s better to ask your theme for guidance at this point, and you can tell them the URL of the current page, they will understand your issue. If you want to look by yourself a bit more, you can check your database, more specifically the postmeta table. This is difficult, so I guess you know a minimum about the database if you want to do this. In this table, the post_id corresponds to your post type, so you can filter this table by the post you are looking for. You might already see an interesting meta_key. In meta_value, if you have something looking like an array of Media IDs, there is a big chance that it might be it. In the case of the Tripod Theme, I can clearly see that _post_image_gallery is used. That’s it.
Array in Post Meta (Imploded)
Similar to Array in Post Meta except that the data will be stored as a string instead of a pure array. For instance, it is used by Kinetika Theme.
Array of (ID -> FullSize) in Post Meta
Similar to Array in Post Meta but the way data is stored it a bit different. It will not be an array of Media IDs but it will be an indexed array that uses Media IDs as indexes, and the URL to the Media as values. For instance, it is used by Photography Portfolio.
Array of IDs as String in Post Meta
It will be stored as a array of IDs, but it will be not encoded the WordPress way, and the data is simply encoded like this: “12, 17, 10, 19”.
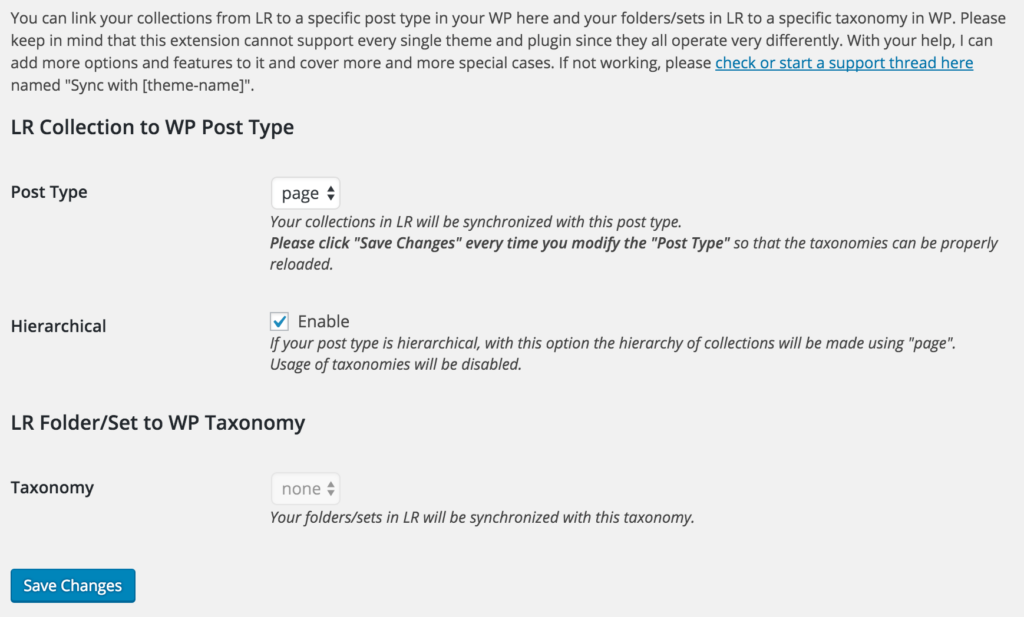
Setting up Post Types
Make sure Post Types is enabled in the WP/LR Sync > Extensions. Then you have access to the WP/LR Sync > Post Types menu. With all the information you got before, you should be able to set up everything accordingly. Start with the Post Type, the Mode, and the Post Meta if required. Save. Then you will be able to link a folder to your taxonomy. Save. Then you are all set. You can try to create a collection in LR. Check if the taxonomy (category or else) is created. In LR, drop an image in it, and Publish. Check your post type in WordPress, the image should have been added.
WP/LR Sync stored all the folders/collections you have created before so you can go in Extensions and click on Resync with Extensions. This will re-create everything. When you switch your theme to another one, you can Reset with Extensions, that will clean your current database from this, switch to the new theme, set everything up again and Resync with Extensions. That’s all, WP/LR Sync keeps all your hierarchy clean and nice on your WordPress.
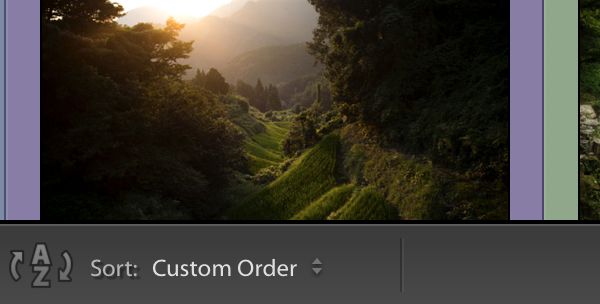
Ordering images
This is supported by WP/LR Sync 3.x and above. You need to choose Custom Order in Lightroom and order your photos. If you add a new photo, everything will be re-ordered on the corresponding gallery/collection in WP. If don’t add any photo to add, right-click on any photo in this collection and mark it as to be republished, then publish. This will force LR to trigger the re-ordering.
Need Help?
If you want me to help you with finding the right settings or adding support specific to your theme, it, unfortunately, takes a lot of time. Consider hiring me for this or, of course, another developer (preferably close to you, that’s always better).
For Theme Developers
Are you making/customizing your own theme or you are a theme developer for WordPress? Would you like to give to your users the chance to synchronize and manage their photos, galleries, albums (or whatever they are called) from Lightroom? That is very easy to do with WP/LR Sync. This plugin supports naturally synchronization of the photos with the Media Library and with your post type and taxonomy through the extensions. There is a plugin for WordPress and another plugin for LR. On LR, the plugin allows the users to create Publish Services that will connect to WordPress websites (please check the tutorial).
Extensions
A few extensions are available in the core of the plugin, others are available on GitHub, on the WordPress repository or even directly in the themes themselves. I recommend theme developers to add those features and additional support in the theme directly, that will make our users’ lives much easier and magical 🙂
An Example
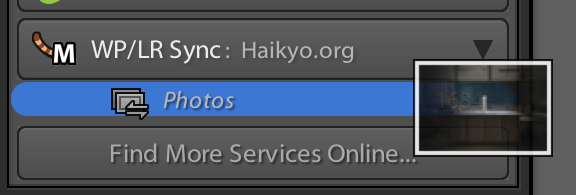
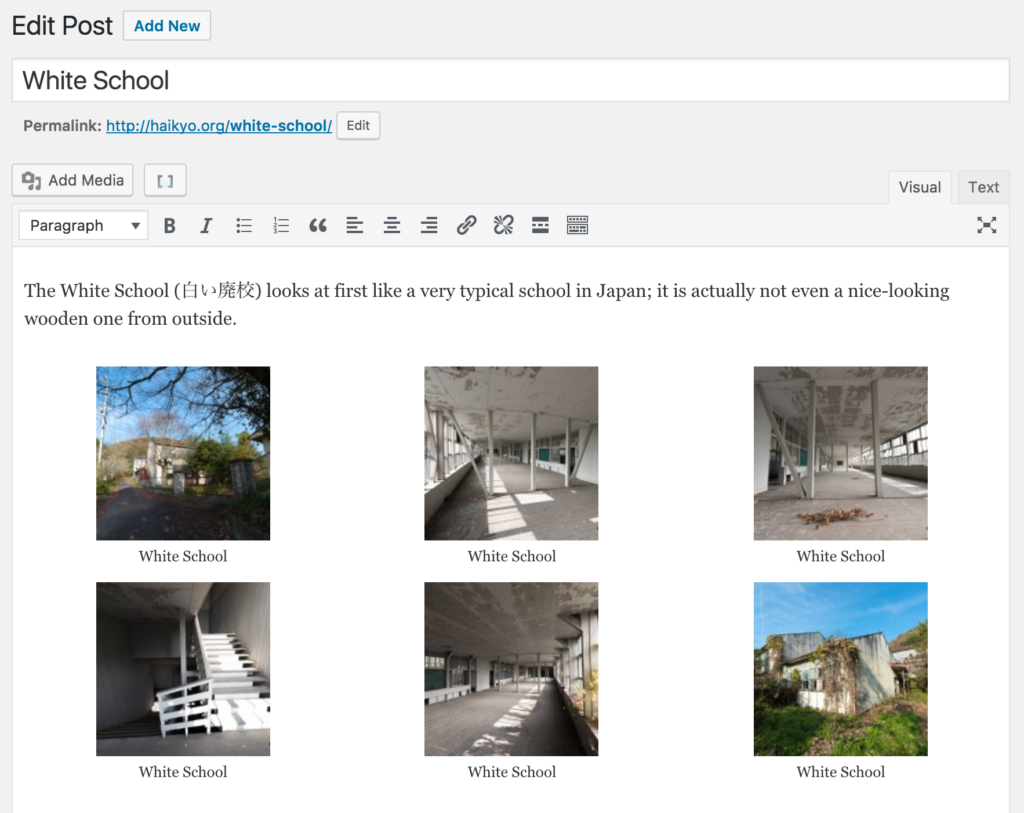
My website Haikyo.org. The folder/set in LR synchronizes to the standard category taxonomy and the collection to a standard post in WordPress.

The images are synchronized with the Media Library and added to (or removed from) a WP Gallery in that post. Everything around that gallery is, of course, not modified by the plugin and the user is free to customize it.
This magic is done through an extension available in the core of my plugin, it is called WP/LR Theme Assistant. This extension supports any post types and taxonomies and might be already working fine with your theme already if you are using standard WP Gallery. This extension also supports managing an array of Media IDs in a custom meta since many themes and plugins use that instead of a WP Gallery.
You can check my website to see what’s the result of doing this. Basically, I create my categories and post from Lightroom, synchronize, write the texts for my posts, publish… then sometimes work again on my photos, add new ones, change my watermark, change the post-processing. Everything is kept updated, I don’t even need to go on the WordPress side. It’s just one click away.
Automatically configure the Theme Assistant for your theme
It is pretty easy to explain to your users how to set up that extension, look at the screenshot below. There are actually a few more options than that but those are the main ones.
But it’s usually better to handle this configuration automatically by the theme. You can set the options directly using this code.
update_option( 'wplr_plugins', array( 'post_types.php' ) );
update_option( 'wplr_posttype', 'galleries' );
update_option( 'wplr_posttype_hierarchical', 0 );
update_option( 'wplr_posttype_reuse', 1 );
update_option( 'wplr_taxonomy', 'gallerycat' );
update_option( 'wplr_taxonomy_reuse', 1 );
update_option( 'wplr_taxonomy_tags', null );
update_option( 'wplr_taxonomy_tags_reuse', null );

// Set the mode
// "WP Gallery": manage a WP gallery in the post (default)
// "Array in Post Meta": manage a custom meta
update_option( 'wplr_posttype_mode', "Array in Post Meta" );

// If using custom meta, this is how to set it:
update_option( 'wplr_posttype_meta', "wpsimplegallery_gallery" );

// Hide the Extensions menu from WP/LR Sync
// update_option( 'wplr_hide_extensions', 1 );
// Hide the Post Types menu from WP/LR Sync
// update_option( 'wplr_hide_posttypes', 1 );
Extension for your theme
If your theme needs more than just that or if you are using something else than a simple WP gallery in a post type, you might need to copy/paste an existing extension and customize it in order that it works nicely with your theme. You can look here at extensions which have been created for two particular themes:
I can provide a free license for you as a theme developer and if you wish.